Roof Construction Explained
How a Pitched Roof Is Actually Built
A pitched roof is built up in layers: structural timber (rafters, purlins and a ridge board) carries the load; a breathable membrane or traditional felt sits over the rafters as the roof's real waterproof layer; battens (and often counter-battens) are fixed on top to hang the covering from; and slates or tiles go on last. Ventilation, flashings, and the detailing at ridges, hips, valleys and verges are what make the difference between a roof that lasts decades and one that fails early.
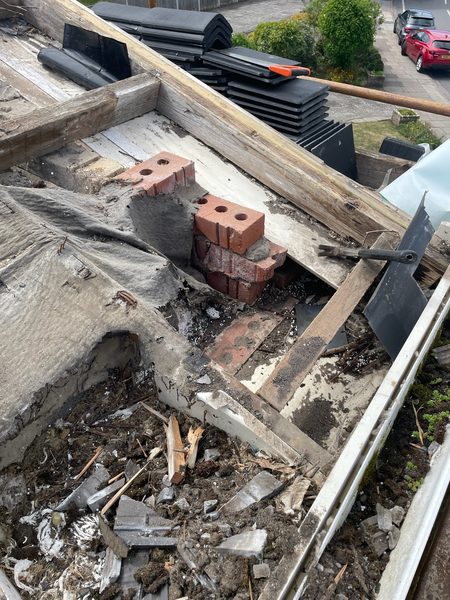
A roof stripped back to its structural timber during a full re-roof — this is what's normally hidden beneath the tiles.
Most homeowners only ever see two things about their roof: the covering on top, and the ceiling underneath. Everything that actually keeps the house dry — the timber, the membrane, the battens, the ventilation path, the flashings — is invisible unless something goes wrong or a roofer strips it back. That's a problem, because it means most people are asked to make decisions (repair or replace, which contractor to trust, whether a quote is genuinely thorough) without ever seeing what they're actually paying for.
This guide opens the roof up. We'll go through every layer of a standard UK pitched roof in the order it's built, explain what each layer is actually doing, where it commonly goes wrong, and what the Building Regulations require at each stage. It's written from 30+ years of stripping, inspecting and rebuilding roofs across Formby, Liverpool, Southport and the wider Merseyside area — not from a manufacturer's brochure.
On this page
- The anatomy of a pitched roof
- Structural timber & roof loading
- Breathable membranes & traditional felt
- Battens & counter-battens
- Roof coverings
- Ridges, hips & valleys
- Verges
- Flashings
- Ventilation & condensation
- Loft insulation & thermal performance
- How water ingress actually develops
- What a professional inspection looks at
- Building Regulations explained
- Common myths
- Frequently asked questions
- Summary & next steps
The anatomy of a pitched roof
Strip a typical Merseyside pitched roof back to nothing and, working from the inside of the house outward, you'll find the same basic sequence on almost every property, whether it's a Victorian terrace in Liverpool or a 1970s semi in Formby:
| Layer | What it does |
|---|---|
| Ceiling & loft insulation | Separates the heated house from the cold roof void; where the insulation sits determines whether the roof is a "cold roof" or "warm roof" |
| Structural timber | Rafters (and purlins, ridge board, ceiling ties on larger spans) carry the entire weight of the roof and resist wind and snow loading |
| Breathable membrane or felt | The roof's real waterproof layer — sheds any water that gets past the tiles, and manages moisture vapour from inside the house |
| Counter-battens (where fitted) | Vertical timber creating a ventilated drainage gap between the membrane and the tile battens |
| Tile battens | Horizontal timber the covering is actually fixed to — must be graded to BS 5534 |
| Covering | Slate, concrete tile or clay tile — the visible, weather-facing layer |
| Ridges, hips, valleys, verges, flashings | The junctions and edges — almost always where a roof actually fails first, rather than the open field of tiles |
Worth knowing: in our experience, the covering itself — the part everyone can see — is rarely what causes a leak. The overwhelming majority of the roof repairs we carry out across Merseyside are at a junction: a ridge, a valley, a chimney abutment, or a verge. The field of tiles usually outlasts the detailing around it.
Structural timber & roof loading
Everything else on the roof depends on the timber underneath being sound and correctly sized. On a standard cut roof, rafters run from the ridge board down to a wall plate at the eaves, typically at 400–600mm centres, with their size determined by span, pitch, and the loads they need to carry. Older properties may also have purlins — horizontal beams part-way up the rafter run — reducing the effective span and allowing lighter rafters to be used.
Roof loading is the combination of the dead load (the permanent weight of the timber, membrane, battens and covering itself — natural slate is considerably heavier than concrete tile, which matters if you're ever considering a material change) and the imposed load (wind uplift and, on this coastline, occasional snow loading). This is precisely why re-covering a roof with a heavier material than it was designed for, or cutting into rafters for a Velux window or loft conversion without proper support, needs to be assessed rather than assumed — see our note on planning permission and structural changes below.
What we're looking for when we assess structural timber on an inspection or during a strip-out:
- Sagging rafters or a dipping ridge line — can indicate historic overloading, undersized timber, or long-term water damage to the timber itself
- Rot or beetle damage — almost always traced back to a moisture problem elsewhere (a failed membrane, poor ventilation, or a long-standing leak at a junction)
- Historic alterations — rafters cut for a loft hatch, water tank, or old chimney breast removal without proper support, which we see more often than you'd expect on older Merseyside housing stock
- Wall plate condition — the timber the rafters actually bear onto at the eaves, which can rot where ventilation and detailing have been poor over a long period
Breathable membranes & traditional felt
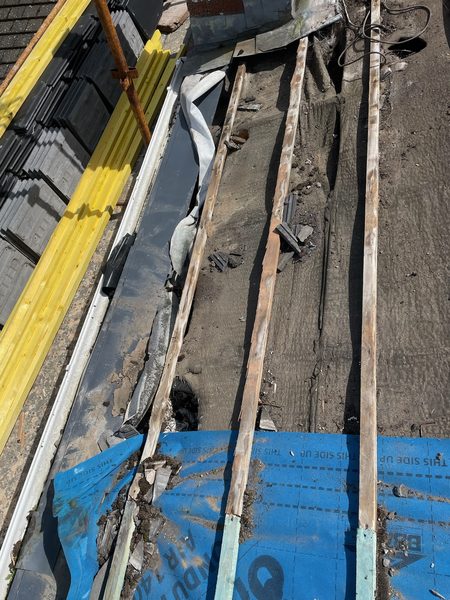
Battens stripped back to the membrane during a re-roof. This layer, not the tiles, is the roof's real waterproof barrier.
This is the layer most homeowners never think about, and it's arguably more important than the tiles themselves. Slates and tiles are not, on their own, fully waterproof — wind-driven rain can get underneath them, especially at low pitches or in exposed coastal locations. The membrane beneath is what actually sheds that water away, down to the gutter, while managing moisture vapour rising from inside the house.
There are two broad categories in use:
- Traditional bituminous felt — the older standard, non-breathable, and reliant on a ventilated air gap both above and below it to prevent condensation. Still perfectly serviceable where the ventilation is correctly detailed, but it's largely been superseded on new work.
- Breathable membranes (low-resistance/LR) — the modern default. Air- and water-tight from outside, but vapour-permeable, allowing moisture from inside the loft to pass through and disperse rather than condense on the underside. This reduces — but under BS 5250 doesn't automatically eliminate — the ventilation a cold roof needs, particularly with airtight coverings like natural slate.
Membranes on new work are specified and installed to BS 5534:2014+A2:2018, which governs wind uplift resistance across UK exposure zones — a genuinely important consideration on an exposed Merseyside or Sefton coast property, where a membrane rated for a sheltered inland site can billow, tear, or pull free of its fixings in the kind of weather this coastline sees regularly.
A membrane fitted without checking its wind uplift rating against the site's actual exposure is one of the most common corners cut on cheap re-roofs. It's invisible once the tiles go back on, and the failure often doesn't show up for a year or two.
Battens & counter-battens
Battens are the strips of timber the covering is actually fixed to, and they're far more regulated than most homeowners realise. Under BS 5534, roofing battens must be:
- A minimum of 25mm x 50mm (or 25mm x 38mm for lighter applications), strength-graded specifically for roofing use
- Individually marked with the supplier, timber species and grading stamp — a batten only marked "BS 8417" confirms preservative treatment, not structural grading, and isn't the same thing
- At least 1.2m long, so each length spans a minimum of three rafters, with joints staggered rather than repeatedly falling over the same rafter
This matters in practice, not just on paper. Counterfeit and under-graded battens are a genuine, documented problem in the UK supply chain — some are deliberately coloured to resemble properly treated, graded stock. Battens that fail to hold a nail under load, or that snap underfoot during installation or maintenance, are almost always the ungraded kind. It's a five-second check we make on every job before a single tile goes back on.
Counter-battens: what they're actually for
Counter-battens are a separate, thinner run of timber fixed vertically — in the same direction as the rafters — on top of the membrane and underneath the horizontal tile battens. They're easy to confuse with tile battens because they're often the same timber section, but the job is completely different: tile battens carry the roof covering's load; counter-battens create a clear, ventilated drainage void beneath them.
Counter-battens become necessary wherever a membrane is draped over open rafters rather than a solid sarking board, so that any water reaching the membrane has somewhere to run rather than pooling against the underside of the battens above. They're standard practice on modern re-roofs and are increasingly specified for exactly this reason during a full strip and re-cover.
Roof coverings
Natural slate and concrete tile dominate pitched roofing across Merseyside, with clay tile appearing on some older or higher-specification properties. Each has a genuinely different lifespan, weight, and cost profile, and we've covered the comparison in full detail separately rather than repeating it here — see slate vs concrete tile for the complete breakdown, and how long does a roof last for realistic lifespans by material.
What's worth adding here, from a construction standpoint, is that the covering is only as good as the layers underneath it. We regularly survey roofs with a covering that still has decades of useful life left, undermined by a failed membrane or rotten batten beneath — and, just as often, roofs where new tiles have been laid over old, non-compliant battens to save cost. A visual inspection from the ground tells you almost nothing about the layers doing the actual work.
Ridges, hips & valleys
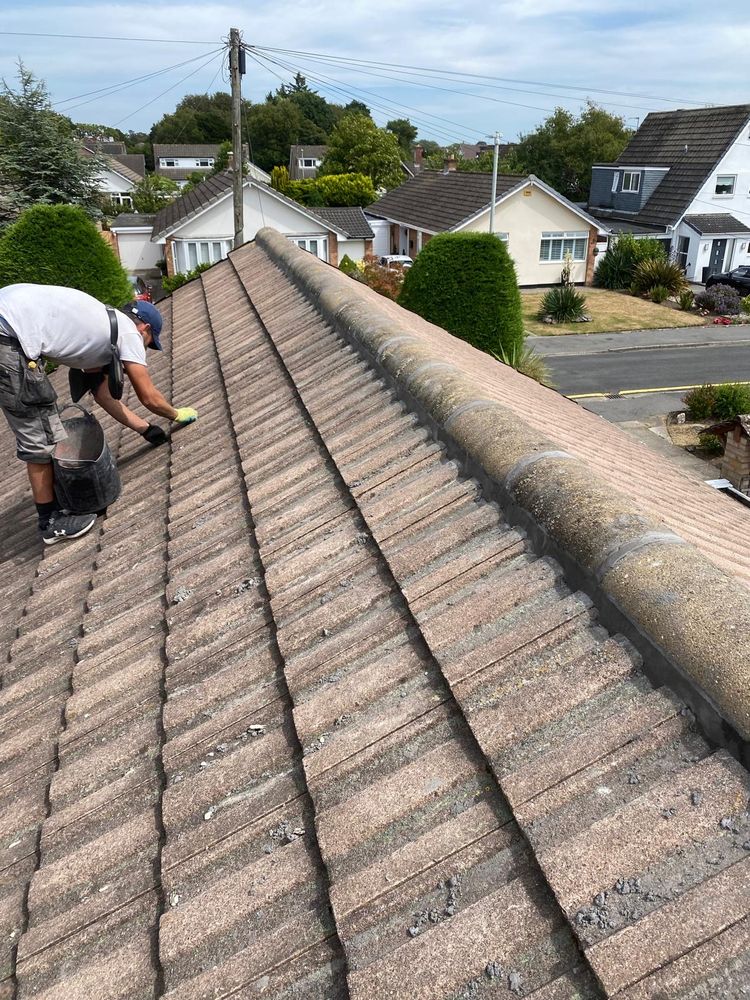
Ridge re-bedding in progress. The mortar bedding at a ridge is one of the most exposed details on the whole roof.
The ridge (the horizontal apex), hips (the sloping external corners where two roof faces meet), and valleys (the internal junctions where two slopes meet and water is concentrated) are where the roof does its hardest work. Valleys in particular carry a disproportionate volume of water relative to their area, since they collect run-off from two full slopes.
Traditionally, ridge and hip tiles were bedded and pointed in sand-cement mortar. This still works, but mortar is rigid while the roof structure beneath it moves slightly with temperature — and over time, typically 15–25 years depending on exposure, that mortar cracks, and cracked mortar at the roof's highest point is a direct route for water ingress. We've written a full explanation of this specific failure mode in what is ridge re-bedding. Dry-fix ridge and hip systems — mechanically fixed rather than mortar-bedded, using a flexible, ventilated union — have become the modern standard specifically because they remove this failure point and, as a side benefit, provide the ridge ventilation path discussed below.
Valleys are typically formed in either lead, GRP, or a valley tile system, laid over a valley board fixed to the rafters beneath. Because of the volume of water passing through them, a poorly formed or undersized valley is one of the most common sources of a leak that seems to come "from nowhere" — the water is travelling along the valley from higher up the roof before it finds a way in.
Verges
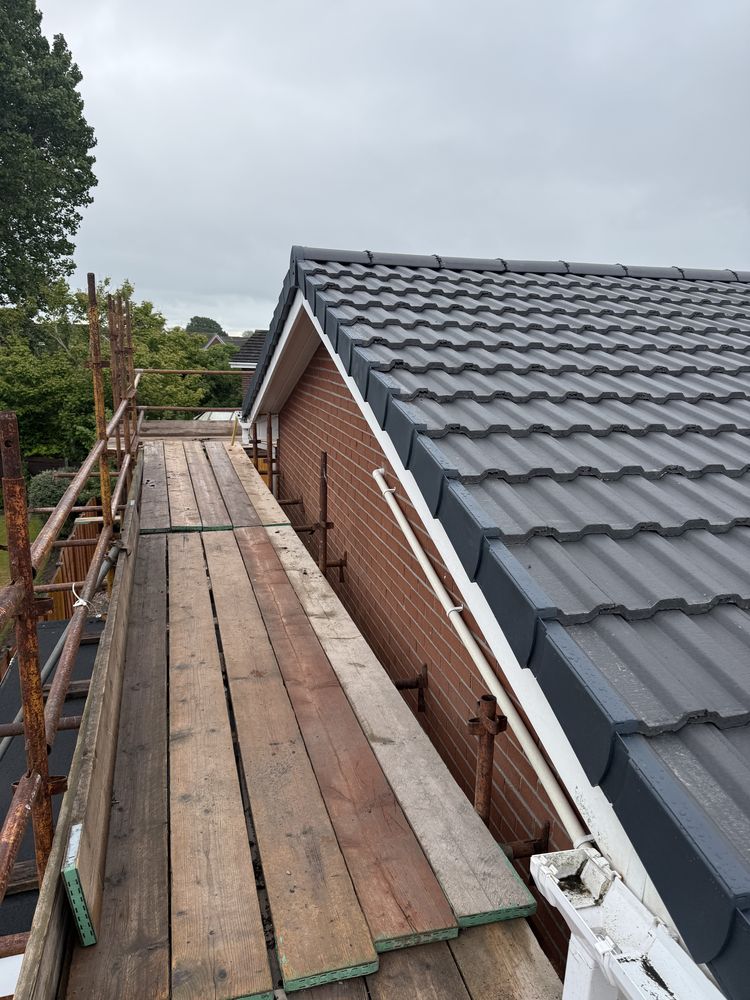
A dry verge system in Formby — mechanically fixed rather than mortar-bedded.
The verge is the sloping edge of the roof at a gable end, where the covering oversails the wall below. Like ridges, verges were traditionally bedded in mortar, and like ridges, that mortar is exposed to the same cycle of thermal movement and weathering that eventually cracks it — often the first place a homeowner notices hairline cracking or a slipped edge tile. Dry verge systems, again mechanically fixed rather than mortar-dependent, have become the standard replacement detail on re-roofs for the same reasons as dry ridges: no mortar to crack, and a small ventilation benefit at the roof edge.
Flashings
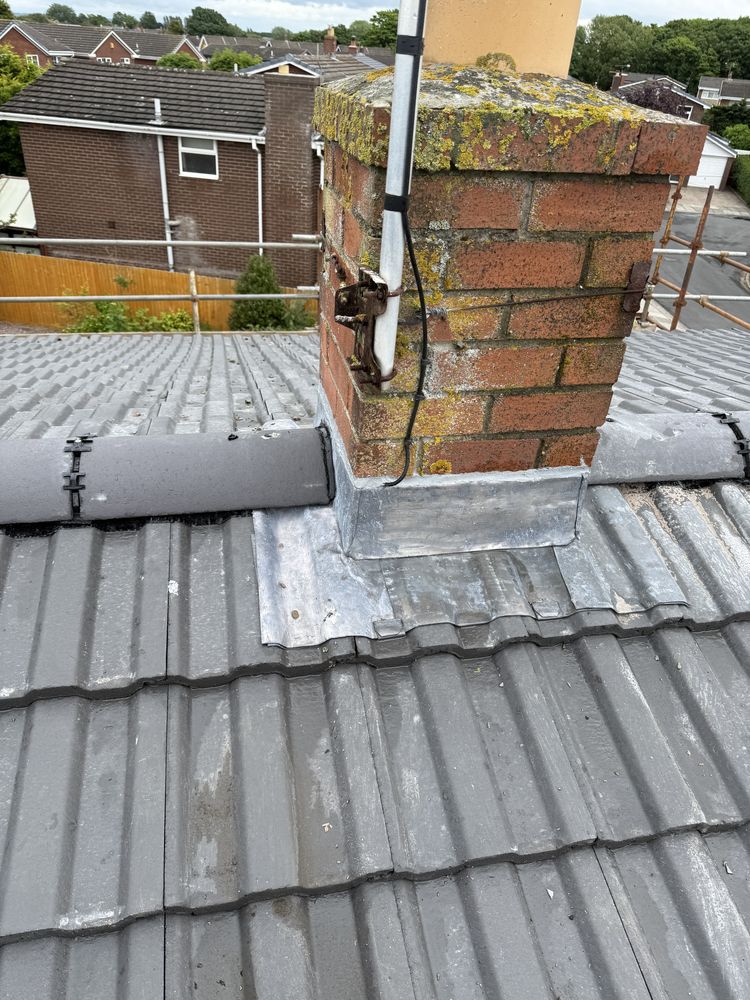
Lead flashing around a chimney stack — the single most common leak location on any pitched roof.
Flashings are the weatherproofing details wherever the roof meets a vertical surface — chimney stacks, party walls, dormer cheeks, or an abutment with an adjoining building. They're almost always formed in lead, graded by thickness (Code 4 or Code 5 being typical for domestic work), and combine several elements: soakers (individual pieces woven between each course of tiles), step flashing (following the line of a stepped abutment such as a chimney side), and an apron or cover flashing dressed over the top.
Chimney abutments are, in our direct experience, the single most common source of a roof leak on older Merseyside properties — more common than failures in the open field of tiles. This is partly because a chimney is a complex junction with several flashing details meeting at once, and partly because lead does move and can work loose over decades, particularly where it wasn't correctly dressed or was fixed with an inadequate fall in the first place. See our dedicated guide to leadwork and chimney flashing problems for the detail.
Ventilation & condensation
Ventilation is the layer nobody sees and almost nobody asks about, and it's one of the most consequential. A pitched roof void needs a continuous path for air to move — typically in at the eaves and out at the ridge, or across from eaves to eaves — to prevent moisture vapour rising from the house from condensing on cold timber and membrane surfaces inside the roof.
The governing standard is BS 5250:2021, and the detail that actually gets specified depends on several variables working together: the roof's pitch, whether it's a "cold roof" (insulation at ceiling level, so the roof void itself is unheated) or a "warm roof" (insulation at rafter level, bringing the roof void inside the thermal envelope), and whether the membrane is breathable or traditional felt. As a general principle, roofs with an airtight covering and a low-resistance breathable membrane typically still need continuous ventilation at eaves level, and often at the ridge too on lower-pitched or more complex roofs, even though the requirement is usually reduced compared with traditional felt. Because the correct figures genuinely vary by roof type and can't be responsibly generalised into a single number for every property, we assess this on-site against BS 5250 rather than applying a blanket rule — but the principle to take away is simple: a breathable membrane reduces the burden on ventilation, it doesn't replace it.
Get this wrong and the consequences are slow but serious: condensation forming on the underside of the membrane or on exposed timber, which over years leads to timber decay, mould growth, and a damp loft even though no rainwater has actually got in. We cover the full picture, including how to recognise the early signs, in our dedicated roof ventilation guide.
Loft insulation & thermal performance
Where the insulation sits changes the entire ventilation strategy above it. In a cold roof, insulation is laid between and over the ceiling joists, keeping the loft space itself cold and unheated — which is why that space then needs cross-ventilation to stop moisture condensing in it. In a warm roof, insulation is fitted between and/or under the rafters, bringing the roof void inside the building's heated envelope; this changes the condensation risk profile and the ventilation detail required, and is common on loft conversions and dormer roofs.
Both approaches affect the roof's thermal performance, measured as a U-value (heat loss in W/m²K — the lower the better). Loft insulation is also one of the most cost-effective single improvements a homeowner can make, and if you're re-roofing anyway, topping it up to current standards at the same time is far cheaper than doing it as a separate job later. See roof & loft insulation and free loft insulation survey for what's involved, and note the Building Regulations trigger for this covered below.
How water ingress actually develops
Understanding the build-up above explains why roofs fail the way they do. A leak rarely appears directly above where the damp patch shows on a ceiling — water tracks along the underside of the membrane, along a rafter, or down a length of batten before it finds a way through the ceiling below, sometimes metres from where it actually entered the roof. This is precisely why "roof leaking but looks fine from the tiles" is one of the most common calls we get — see roof leaking but looks fine for the full explanation of how that happens and what we look for when we go up.
Moisture movement in a roof isn't limited to rainwater getting past the covering. It also includes water vapour rising from the living space below (managed, or mismanaged, by the ventilation strategy above), and, less commonly, wind-driven rain forcing its way past an otherwise sound covering at very exposed sites — a real factor on parts of the Sefton and Merseyside coastline. Recognising which of these three routes is actually responsible is the difference between a repair that fixes the problem and one that treats a symptom.
What a professional inspection actually looks at
When we carry out a proper roof survey, we're assessing every layer covered above, not just the visible covering:
- Structural timber condition — sagging, rot, historic alteration, wall plate condition
- Membrane condition and type — visible where accessible from the loft, or by lifting a sample area of covering
- Batten condition and grading — whether they're holding fixings properly, and whether they're genuinely BS 5534 compliant
- Covering condition — slipped, cracked, or missing units; nail fatigue on older slate roofs
- Ridge, hip, valley and verge detailing — mortar condition, dry-fix condition, valley capacity
- Flashing condition, particularly at chimneys and abutments
- Ventilation path — is there a genuine, unobstructed route for air to move through the void
- Signs of historic or active condensation — timber staining, mould, corroded fixings
Full detail on how we run this process is in what happens during a free roof inspection.
Building Regulations explained
Roof work in the UK sits under Building Regulations, which are a separate system from planning permission — planning controls what your home looks like and whether you're allowed to build something; Building Regulations control how the work is actually done, covering structure, weathertightness, ventilation and energy efficiency. A straightforward like-for-like re-roof rarely needs planning permission, but it will still fall under Building Regulations. See planning permission for a new roof for where the two overlap.
Part A — Structure
Covers the structural adequacy of the roof and any alterations to it. Relevant whenever rafters are cut, notched, or removed — for a Velux installation, a loft conversion, or historic chimney breast removal — to make sure the remaining structure can still carry the loads discussed earlier in this guide.
Part C — Site preparation and resistance to moisture
Covers the roof's fundamental job: keeping weather out. This is effectively the regulatory backing for correct membrane specification, flashing detail, and weathertightness generally.
Part L — Conservation of fuel and power (thermal performance)
This is the one that catches most homeowners by surprise. Under Approved Document L1B, where you renovate or replace a roof and the work affects more than 50% of the surface of an individual roof slope, or more than 25% of the total roof area of the building, the regulations require that slope to be brought up to the current insulation U-value standard as part of the job — not just re-covered like-for-like. In practice, this is why a compliant quote for a substantial re-roof will usually include an insulation upgrade, even on a job that started out as "just replace the tiles."
Ventilation requirements under BS 5250, discussed above, sit alongside Part C and Part L rather than under a separate Part of their own, but Building Control will expect to see them correctly detailed as part of a compliant re-roof.
Building Control, notification, and completion certificates
Roof refurbishment work that crosses the 50% threshold above must be notified to Local Authority Building Control. There's only one government-authorised Competent Person Scheme covering the roofing sector in England and Wales — the NFRC's scheme — which allows a registered roofing contractor to self-certify that the work complies, rather than the homeowner having to arrange and pay for a separate Local Authority Building Control inspection. Either route should end with a completion certificate, which you should keep: it's routinely requested by a buyer's solicitor when you come to sell, and its absence can hold up or complicate a sale. We go into what this means in practice, and what happens if it's skipped, in independent building control sign-off and what happens if not signed off.
Common myths
Myth
"A breathable membrane means the roof doesn't need any ventilation."
Fact
It reduces the ventilation requirement in many cases, but under BS 5250 it doesn't remove it altogether, particularly with airtight coverings like natural slate.
Myth
"If the tiles look fine, the roof is fine."
Fact
The covering is only one layer of several. We regularly find sound-looking tiles over a failed membrane or non-compliant battens.
Myth
"Any strip of wood will do for battens."
Fact
Roofing battens must be individually graded and marked to BS 5534. Ungraded battens are a documented, ongoing problem in the UK supply chain.
Myth
"Building Regulations only apply to a full new roof."
Fact
They apply to any re-roof affecting more than 50% of a slope, or 25% of the total roof, including substantial repairs.
Frequently Asked Questions
Summary
A pitched roof is a system, not a single surface. Structural timber carries the load; a membrane does the real waterproofing work; battens and counter-battens hold everything together with a working ventilation path beneath the covering; and the detailing at ridges, hips, valleys, verges and flashings is where most real-world failures actually start. Understanding this makes it far easier to judge a quote, ask the right questions of any roofer, and recognise when a problem needs more than a surface-level fix.
Want to see the layers of your own roof?
We offer free inspections across Merseyside. We go up, take photos of every layer we can access, show you exactly what we find, and give you an honest recommendation — repair or replace. No pressure, no obligation.
Related guides
Guide
Pitched Roofs Guide
Materials, lifespan and common problems →
Guide
Roof Ventilation
Why it matters more than you think →
Guide
Ridge Re-Bedding
What it is and when you need it →
Service
Leadwork
Flashings, valleys and chimney detailing →
Guide
Building Control Sign-Off
What compliant re-roofing actually involves →
Service
New Roofs Merseyside
Our pitched roof installation service →